Tuesday, November 27, 2012

Low Carb Tacos

Before we went on this low-carb, grain-free diet, we ate tacos every Friday.  Needless to say, our family really loves tacos.  So we have been missing our Friday taco nights.  I got this idea from one of my low-carb cookbooks.  It does take some time since you have to make the taco shells one at a time, so make sure you either make them ahead of time or leave yourself plenty of time to make dinner.
You will need LOTS of shredded cheese (about 1/4 cup for each shell), coconut oil, a nonstick skillet (about 6-8 inches), a good quality spatula, and a spoon.
Also, you will need to get a taco shell-cooling station ready before you start.  You'll need a tray or rimmed baking sheet, a sturdy book (the spine should be an inch or so thick) and aluminum foil.  Cover the tray with aluminum foil.  Then set the book up on the tray as shown.  Cover the book with aluminum foil.  And I mean cover it well.  You don't want grease dripping all over it.  You'll end up with a mess and a ruined book.
 
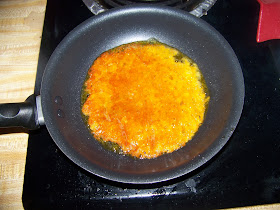
Start heating your oil in the skillet on medium to medium high heat.  Once the skillet is good and hot, drop about 1/4 cup of shredded cheese in.
 
Once the cheese starts to get brown on the bottom, flip it over.  I found that it really helps to put the spatula in one hand, and a wooden spoon in the other hand to help get the cheese on the spatula.
 
Let it cook on the other side for a few minutes.  Then it's ready to take out of the skillet.  Using your spatula and spoon (careful not to touch the cheese!) drape the fried cheese circle over your aluminum foil-covered book.
 
Let it dry/cool for at least 5 minutes.  The cheese will harden into a taco shell shape as it cools.  You can start making the next shell while the first one cools.
Once the shells are cooled off, start adding taco fillings as you would with regular tacos.
I made us 3 taco shells each, but it turns out they are really filling so we probably could have done with 2 each.  I was really pleased with the way these turned out!  They were really tasty.  I thought the shells tasted a little like Cheezit crackers.  Either way, they were great and I will be making them again!


Sunday, November 25, 2012

Homemade Double Down Sandwiches

I have been wanting to try a double down sandwich from KFC for a long time now.  But, every time I go there and ask for a grilled Double Down sandwich they either tell me they can't make it or they give me some other excuse why I can't order it (even though it is on their menu).  The fried version just isn't healthy enough for me.  Too many carbs and it's not grain free.  I figured even if I could manage to order one, I could make my own cheaper and much healthier version of the sandwich.  Turns out, I was right! 
All you need are some chicken breasts (I used the cutlets), bacon, and cheese.
 
First, you will need to flatten the chicken breasts.  This is the fun part!  Put them on some kind of tray or rimmed baking sheet.  You will want to cover them with something so the raw chicken juice doesn't splatter all over the place.  I used parchment paper, but I'm sure you could use wax paper, plastic wrap, or maybe even aluminum foil.  Pound them down very thin with a meat hammer (this is a great way to take out your daily frustrations!)

I found that once I flattened the chicken cutlets, they were a little on the large side, so I cut each of them in half.  Bake them in the oven for 20-25 minutes at 400 degrees.
While the chicken is cooking, fry up the bacon on the stove.
Once the chicken is done, place a piece of cheese on one side of each chicken "bread."

Put one or two slices of bacon on each sandwich.  Put the other piece of chicken "bread" on each sandwich.  The result is a very healthy, high protein, carb-free sandwich that is also very filling.  These were very tasty and I have added this recipe to our regulars!


Monday, November 12, 2012

Water Saving Tip

Not long ago I mentioned that I have been trying to find new ways to save money.  For example, I recently posted about making reusable tissues.  There are a lot of small things you can do that can add up to a lot of savings.  This is a super easy tip that I had heard of before, but never really got around to doing it.  I saw it again on Extreme Cheapskates and I decided to go ahead and try it out.  They say it saves $8 per month and $100 per year.  Multiply that by the number of toilets you have in your house and that is your yearly savings.  So according to those calculations, I can save up to $200 just by using this simple trick.  It may not be a whole lot in the span of a year, but wouldn't you rather keep that money than give it to the water company?  I sure would!
All you need is a brick or large rock.  Chances are you already have one around your house somewhere.  If not, Home Depot sells them for $0.49 each.  Take the top off your toilet tank.  Place the brick inside (make sure to put it away from the mechanisms, otherwise it could knock them out of place, causing the toilet to not work properly).  Put the top back on.  That's it.
 
The brick in the toilet tank takes the place of the extra water, causing the toilet to use less water per flush, which saves water, and that saves you money.

Sunday, November 11, 2012

Low Carb Pumpkin Sausage Soup

 
This is one of my favorite new recipes.  I originally found the recipe here, but I adapted it a bit.  This recipe is low carb, sugar free, dairy free, grain free and gluten free.  The original recipe calls for mushrooms, but I'm not a fan of mushrooms, so I left them out, but I added a few other veggies.  Also the original recipe is made on the stove, but I adapted it for a crock pot.
 
Ingredients:
1 lb mild pork sausage
4 cups (1 32 oz carton) chicken broth
1 15 oz can pumpkin puree
1/2 medium onion, chopped
1 green pepper cut into small pieces
1 cup carrots, chopped
1/2 tsp garlic powder
1 tsp Italian seasoning
salt and pepper
 
Cook the sausage in a pan and drain off the fat, if any.  Add chopped onions.  Pour into crock pot.  Add all other ingredients and stir.  Cook on low for 6-8 hours.
I have made this twice already and I absolutely love it!  I could make it every week.  I get excited when I make this, not only because it's a crock pot recipe that I don't have to worry about making, but also because it's delicious and super healthy.  It makes about 8 1-cup servings, but trust me, you will probably eat at least 2 servings!  And we always have a ton left over.  It tastes great when you reheat it the next day.  Let me know if you try it and what you think of it!

Easy Carpet Stain Remover

Our house doesn't have a lot of carpet.  In fact, it is all hardwood floors except for our spare bedroom.  Last week I was working on cleaning up and organizing our spare bedroom, and I found this stain underneath a basket full of craft supplies:
 

No one knows what it is or where it came from.  It wasn't there when I put the basket there a year or two ago, and all that was in the basket is yarn.  So anyway, I thought I remembered seeing a pin on Pinterest about removing carpet stains.  Sure enough, I was right.  I followed this link to find an easy recipe for a miracle carpet cleaner using things that most everyone already has in their house.
All you need is a small bowl/container, hydrogen peroxide, blue Dawn dish detergent, and an old toothbrush or other scrub brush.
I poured a little bit of peroxide into a bowl, and then squirted some Dawn in.  I used an old toothbrush to mix it up, and then I started scrubbing at the stain.  It didn't even take much scrubbing; the stain came out almost instantly.  I scrubbed for an extra long time just to make sure I got it good and clean.  Then I took a rag and some hot water and washed the soap out of the carpet.  Here is what it looks like now:

Not too shabby, huh?  So remember this for the future: Don't spend money on rug shampoos or for professional carpet cleaning when you can get stains out so easily (and cheaply) by yourself.