Monday, January 30, 2012

Washer Hose Lint Trap

Okay, I know this isn't the most exciting or glamorous post, but it was an idea I came up with while we were cleaning our basement this weekend.  And I mean CLEANING our basement.  We threw out some stuff that has been sitting down there for years.  It hasn't been this clean since we moved in over 4 years ago.  I really wish I would have taken before and after pics.  But anyway, I'm getting off topic. 
One of the messiest/dirtiest places in our basement was the laundry area, particularly the sink.  I think we are eventually going to replace it, but for now, I cleaned up that area really well.  While cleaning the sink, I realized that the hose that empties from the washer into the sink used to have a little do-hickey on it that kept lint and dirt from being washed down the drain.  Somewhere along the line, it got lost or thrown out.  And the sink is not completely clogged, but it's getting there.  So I thought, I need a new do-hickey to put on that hose to keep the sink from getting clogged.  And then a light bulb turned on in my head.  I can make my own!

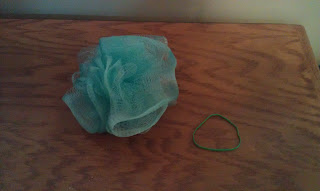
All you need are an old bath pouf, scissors, and a rubber band.
Start by cutting the string that's holding the netting of the bath pouf together.
Then unravel the bath pouf into a long strip.
Tie a knot at the end.
Cut about 6 inches up from the knot.  (You can save the rest of the netting to make new lint traps when yours is full.  That way, you don't have to clean it out.  Yech.)
Place over the washer hose and secure with the rubber band.

So simple!  (By the way, please excuse my nasty laundry room sink.  But just imagine how bad it looked before I cleaned it!)  Keep in mind that if you need a lint trap for your washer hose, or lose yours like I did, you can save yourself a trip to the hardware store and a headache trying to find what you're looking for by easily making your own.

Sunday, January 29, 2012

Lotion Bottle Cell Phone Holder


I first saw something like this posted on Pinterest, but when I tried to follow the link, it just took me to a picture without instructions.  So I decided to make one on my own.  It didn't seem too hard to figure out, and it wasn't!  This is a holder for your cell phone to use while you charge it.  It's made out of an empty plastic bottle.  I used this empty baby lotion bottle, but you could probably use pretty much any type of bottle.

You can start by throwing away the cap.  You won't need it, and if anything it will just get in the way.  Rinse the bottle thoroughly with warm water.  Then peel off the labels.  You can use a hair dryer to get the labels to peel off more easily.  Trust me, it's nearly impossible to take them off without it. 
Then you will have a plain, clean bottle.
 
Using a pen, trace around the top of the bottle like so:
This is the back view.  Draw a straight line across the front.  It helps to use a ruler or straight edge.
Then use a strong pair of scissors to cut along the lines.  Once you have cut the piece out, draw a square shape in the center of the tab sticking up at the top.  Cut that piece out too.  Now you should have something like this:

Choose a fabric scrap that you like and/or coordinates with your decor.  This is what I picked out of my scrap fabric box:
This is right about when my camera battery died, and I had camera issues from then on, even after I charged my battery.  So I would have had more pictures, but I had to settle for the ones I already took plus a "finished" pic.  Anyway, take a brush and some Mod Podge and brush Mod Podge all over the bottle.  Wrap the fabric around the bottle as tightly as possible.  Work with the ends, smoothing them down.  Let the glue dry.  Using more Mod Podge, work the ends around the bottom, gluing as you go.  You may have to hold the ends in place for a little while as the glue is drying.  Take your scissors and cut the fabric around the edges of the plastic, cutting as close as possible to the plastic edges.  I would recommend Mod Podging at least one layer over the fabric when you are done.

Here is the before:

Here is the after:

 
Nice, huh?  It keeps your cell phone up off the floor, and it looks pretty at the same time.  You can't ask for much more than that!

Saturday, January 28, 2012

Built-In Potty Seat

No, this isn't something I made but it's something I had to share.

This week, the toilet seat in our hallway bathroom finally broke.  Probably from opening and closing it so many times to dump the potty chair out, flush, and say, "Bye bye, pee pee!" 
So off to Home Depot we went.  We walked down the toilet seat aisle and found this:


Yes, that's a toilet seat with a little person potty seat built right in.  Pretty cool, huh?  Well, I know I was excited about it.  We have both the stand-alone potty chair and the potty seat that you can put over the toilet seat, but this just makes so much more sense.  To be honest, I am hoping that we can be done with the potty chair ASAP.  It gets in the way, and it just grosses me out having to pour it into the toilet every time.  But, if it's what Angie needs to learn, then we'll tolerate it for now. 
Home Depot has them available here.  But it looks like they are only available in the store.
I like this built-in version of a regular toilet seat much better because you don't have to keep putting the seat over the toilet and taking it off every time your child goes to the potty.  Besides, the ones that you put over the toilet seat don't seem to fit very well and they always jiggle when they sit on it.  And we can use this even after we are done potty training.  We can use it as long as Angie stays little.  Which I hope will be for a long, long time.

Friday, January 27, 2012

Ultimate Luxury Bath


Us moms need some pampering every now and then.  It's hard to find some real "me time."  For me, "me time" usually means cleaning, cooking or doing laundry without being disturbed.  But today, I actually had a few hours to myself so I took a bath.  And not just any bath.  I don't think it's worth it to take a bath unless you make it the best kind of bath.  So, first of all I used some of my detox bath salts.  Here is what you need to make your own:
2 cups Epsom salts
2 cups baking soda
2 cups sea salt
5 tbsp ground ginger
Mix it up and keep it in a container.  You will have plenty extra for future baths.  When you run the bath water, add 1 cup of the bath salts and 1 cup of vinegar.


This time, I also tried a deep conditioning treatment on my hair because it had the winter blahs and needed a pick-me-up.  I found a recipe for a homemade hair conditioner here.  Mix 1/4 cup mayonnaise, 1/4 cup vanilla yogurt and half an egg white in a bowl. 


Make sure you have your ipod, extra towels, scented candles, your bowl of homemade conditioner and whatever else you want for your luxury bath.  I keep a pumice stone in the bathtub so I can make my feet nice and smooth while I'm soaking. 
Wet your hair and then apply the conditioner.  Then soak in the bathtub for at least 30 minutes.  Trust me, the detox bath salts work, you will come out feeling refreshed!  When you are done, rinse your hair out well and shampoo.  You won't believe how soft and shiny your hair will be.  You will come out feeling like a new woman!

Thursday, January 26, 2012

Guilt-Free Banana Split


This is a very satisfying treat when you are craving ice cream while on a diet.  Not only does it taste like a banana split, but it's made with all guilt-free ingredients so you can eat one every day and still stick to your diet.

Here's what you will need:


Banana
Whipped cream
Sugar-free chocolate syrup
Optional toppings: chopped nuts, sliced strawberries, sprinkles

Put the whipped cream in the freezer (I guess this would be a good time to mention that you should use the kind that comes in a plastic container, not the aerosol cans).  Slice the banana lengthwise.  When frozen, scoop 2 scoops of whipped cream on top of the banana (about 1/2 cup).  Pour chocolate syrup over it.  Add any other desired toppings.


Take a big bite.  I know, right?  Delicious!  And here's why you don't have to feel guilty: all of the ingredients are healthy.  You've got the banana, and well, duh, that's fruit.  Whipped cream is low in calories, fat, and sugar, and when you freeze it, it tastes a lot like ice cream.  And the sugar-free chocolate syrup is low in calories and sugar too.  Besides, you don't have to use a lot of it anyway.

Here is the nutrition information for one banana split:
Calories: 200
Fat: 4g
Saturated fat: 4g
Trans fat: 0g
Cholesterol: 0mg
Sodium: 50mg
Carbs: 41g
Fiber: 4.1g
Protein: 2.3g

Wednesday, January 25, 2012

Weight-Loss Wednesday


Yes, this blog is about making fun projects, not about weight loss.  But let me tell you, weight loss has been a huge project in my life.  But not a fun one.  I like to think of it as "making a new me."
I have struggled with weight for pretty much my whole life, especially in the last 10 years.  I was diagnosed with PCOS early in 2008.  The symptoms of PCOS include weight gain, acne, carb cravings, and infertility.  I discovered that I had it while my husband and I were trying to conceive our first child.  After a year of trying, I went to a doctor for tests, which confirmed that I had PCOS.  Luckily after a few months of using fertility drugs, we finally conceived a baby.  Angela Faith was born in March 2009 and she has been the biggest blessing in our lives. 
Anyway, by then, I weighed 60 pounds more than I did on my wedding day.  I tried my best to eat healthy, but it was hard since I was busy with work and being a new mom.  Near the end of 2010, we decided that Angie needed a baby brother or sister.  I started eating healthy, i.e. low calorie and low carb.  We bought a treadmill in January which I used every day.  We went back to the fertility doctor and found that I was pregnant with our second child in April 2011.  Then at my 10 week appointment in June, I was told that our baby no longer had a heartbeat.  That was the most devastating blow of my life.  Since then I have continued to diet and exercise with little results. 
All along, I have tried many diets and exercise programs.  All with little or no results.  I even started a strict diet once, eliminating all sugar and counting calories.  I gained 8 pounds within the first week.  That terrified me.  So the whole dieting and exercise thing is a little touchy for me.  I feel like I have no control.  Which is not exactly true.  The truth is I have very little control, but I do have some.
I get so sick of reading magazine articles about women who have lost a lot of weight.  They all go something like this: 
I had been overweight my whole life.  I felt like I tried everything and it never worked.  Until I turned my life around and started doing X, Y and Z.  I lost 100 pounds in one year and now I'm super skinny and healthy.
Those articles are meant to encourage people.  They don't encourage me.  They make me upset because when you have already been doing X, Y and Z for more than a year with little results, it's difficult to be happy for those people.
Having this obstacle in my way, it has been a very difficult and endless journey.  I'm sure it would be even without having to deal with PCOS.  I have been going back and forth the last several years.  Meaning I will start a diet and exercise plan and continue it for a few months and then give up after it produces no results.  Well, I finally came to a realization:

It's not going to be easy.
It's not going to be fast.
It's not going to be fair.

Since I have PCOS, diet and exercise are not going to produce the same, or even similar results as someone who does not have it.  Which means it will not be easy or fast.  And it's definitely not fair.  Am I okay with that?  Absolutely not!  But what other choice do I have?  So my new plan is to NOT GIVE UP.  I certainly don't like the fact that I can spend 6 months on a strict diet, working out on the treadmill every day for 45-60 minutes and not lose a pound.  But if I keep going, I will eventually lose a small amount of weight.  Some days it doesn't seem like it's worth it.  All that work and for so little.  Sometimes I feel like I would be a lot happier eating cake and cookies than playing the weight loss lottery.  But I am determined to keep going.  Now, I have lost some weight in the last year.  Just not nearly as much as I would have expected to based on what I've been doing.  If I hadn't lost any weight at all, then I'm positive I would have given up by now.  It's hard to be motivated if what you're doing doesn't produce any results.  I do, however, have a couple other things that motivate me.  One is my family.  I want to be healthy so that I am here for them for a long time.  I also want to be healthy so that one day we may have another child.  Although that still scares me to death, I believe it will happen some day, I just need to remember it's in God's time.  Secondly, I don't like the person I see in the mirror.  I hate seeing pictures of myself because the person I see in the pictures is not the same person I see in my head.  In my head, I see me from about 8-10 years ago.  When I see how I actually look, it is pretty upsetting.  I would like for the real me to look more like the me I see in my head.
So anyway, there is my big, long personal story about what I have been through.  I will continue to work on myself until I get to where I want to be.  And I am prepared for that to take a LONG time.  So from now on, I plan to have "Weight Loss Wednesdays" where I will post about weight loss.  Whether it's something that helps, or just my progress, that will be the topic on Wednesdays.

Tuesday, January 24, 2012

Laundry Detergent

If you haven't already, be sure to check out Making Cooley Stuff on Facebook and like the page so you don't miss out on any awesome projects!

Sunday, January 22, 2012

Soap Dish Repurposed into Ipod Case

Lately I have had this fascination with finding new uses for containers.  Whether it's reusing an old jar or container for something new, or using a container for something other than its intended use, I absolutely love it.  My husband got me a new Ipod Touch Nano for Christmas.  It is really nice, and great for working out because you can clip it to your clothes.  I also got some new ear buds for it, and I never really used them before.  With my old ipod, I would normally plug it directly into the car or treadmill speakers.  So I was thinking I needed some kind of case or holder for it.  I wanted to protect it when it's in my purse, and I also worry about it getting lost since it's so much smaller than my old ipod.  Rather than giving in to temptation and buying this really cool Vera Bradley ipod case I found, I made my own.  For $0.94, I bought this travel soap dish at Walmart which is the perfect size for my ipod and the ear buds.

Yes, the Vera Bradley one would have been cool to have, but I just saved myself $15 plus shipping.  And I can take pride in knowing I came up with a cool way to repurpose a travel soap dish.


Checkered Ribbon Shirt


I got the inspiration for this project from a weaved ribbon purse that I made many years ago.  I started thinking about making some other type of clothing or accessory with the same technique.  Making a shirt entirely out of weaved ribbon just seemed like overkill to me.  Not to mention it would look way tacky.  But then I got the idea of weaving ribbons into the shirt itself, but just doing it on a small part of the shirt so it wouldn't be too loud. 
I made this project a few months ago before I started this blog, so I don't have step-by-step pictures, but I think that my instructions speak for themselves.

I bought a plain, long-sleeved cotton t-shirt from Old Navy to use for this project.  Other materials I used were 5/8 inch black ribbon, 1/4 yard of fusible interfacing, a rotary cutter and ruler, a cutting board, an iron, and a sewing machine.


I started by trying on the shirt and figuring out exactly where I wanted the ribbon design to end.  You don't want to start the project and then realize that it cuts you right across the bust.  Then I put the cutting board on the inside of the shirt.  Using the rotary cutter, I began to cut across the front of the shirt very carefully.  Since I was using 5/8 inch ribbon, I made the cuts 5/8 inch apart.  I did this all the way up to the top of the shirt. 
Once I was done making the cuts, I slipped the fusible interfacing between the cutting board and the front of the shirt.  It makes it a lot easier to have it already in there once you are ready to iron everything in place.
Then I began weaving the ribbon through the cuts I made, making sure to push them together tightly as I went along.  Once I had ribbons woven in all the way across, I put a towel over the shirt to protect it, and ironed it all together (with the fusible interfacing still on the back). 
After ironing on the fusible interfacing, there were still a few sections that needed to be sewn together.  Just look to see where there are still "holes" in your shirt that need to be sewn up.  You can use either a sewing machine or a needle and thread. 

When you need to wash the shirt, put it inside a delicates bag or pillow case and wash it on the delicates or hand wash cycle.  Hang to dry.


Saturday, January 21, 2012

Kid Solution: Bendy Straws


My biggest pet peeve about going out to eat with kids is the drinks.  They have these tiny little cups for children, but then they give them a straw that is 3 times taller than the cup.  I hated how my daughter would always struggle to drink from the straw at restaurants.  And once, the one time that I let her get red fruit punch, she had so much trouble with the straw that she ended up knocking her cup over.  And of course it spilled all over her. 


Now, some restaurants have bendy straws which I appreciate very much.  They are so much more manageable for little ones.  The only problem is there are very few restaurants that have them.  My solution to this problem was to keep bendy straws in the diaper bag so we would have some with us at all times.  That way we could swap out the tall straws for the bendy straws, and Angie could easily drink from her cup by herself.  Well, as she got older, we used the diaper bag less and less, and now that she is almost potty trained, I think it is pretty much retired.  So I decided to keep them in my purse.  Only problem is, my diaper bag had this great zippered side pocket that was perfect for the straws.  My purse has the same side pocket, but it is already being used for my keys.  Since I didn't have a good place to put them in my purse, I would just have to try to remember to grab one before we left every time we went out to eat.  That is hard to remember.  Plus, sometimes you don't know that you are going out to eat until after you leave.  Not to mention they get dirty and bent out of shape in my purse.  So, this is yet another project idea that has been in my head for quite awhile.  I needed some kind of pouch or case to keep the bendy straws in.  Since I always prefer knitting to sewing, I decided on a knitted pouch.  I came up with this pattern:

Materials: 
Cotton yarn
4 size 8 dpns (double pointed needles)
button and matching thread

Instructions:
Cast on 18 stitches.  Divide them equally among 3 dpns. 
Begin knitting in the round, and continue until the piece measures approximately 8 1/2 inches. 
Bind off 9 stitches.  Continue knitting in stockinette stitch on the remaining 9 stitches for another inch.
Next 2 rows:
Knit 3, bind off 3, knit 3.
Knit 3, cast on 3. knit 3.
Knit 4 more rows in stockinette stitch and then bind off all stitches.
Line up the button under the button hole and sew on.
Sew up the bottom and weave in loose ends.


Now I can keep several bendy straws in my purse for when we go out to eat.  They won't get lost in the bottom of my purse, and they won't get dirty or bent.  And best of all, I don't have to worry about Angie spilling her drink because the straw is too tall for her.


Friday, January 20, 2012

Cheeseburger Chowder


I concocted this recipe several years ago when I went to a restaurant and ordered their soup of the day, which was called "Cheeseburger Chowder."  I was disappointed when they brought me a bowl of cheese-flavored broth with bits of ground beef in it.  When I hear "chowder" I expect a thick, creamy, chunky soup.  So I wrote my own recipe for it:

Cheeseburger Chowder

Ingredients:

1 lb ground beef
2 10 oz cans cheddar cheese soup
1 8 oz package cream cheese
3/4 cup chopped onions
1/3 cup ketchup
1 1/2 cups milk
1 15 oz can corn
pepper

Directions:

Step 1:  Cook ground beef on stove top.  Pour off grease.  Add onions and cream cheese and cook until the cream cheese is melted.  Add to a greased slow cooker.


Step 2:  Add all other ingredients to the slow cooker and stir.  Cook on low for 3-4 hours.


Since I wrote this recipe, I have come up with several ingredient swaps to make it healthier:

          • Use "no sugar added" corn instead of regular corn
          • Use sugar free ketchup instead of regular ketchup
          • Use almond milk instead of regular milk
          • Make your own cheese sauce instead of using cheddar cheese soup

To make your own cheese sauce, you will need 1 cup of almond milk and 1 1/2 cups of shredded cheddar cheese.  Heat the almond milk in a saucepan on medium heat.  Add the cheese about one tablespoon at a time and wait until it is melted to add more. 


There you have it.  This makes about 4 big bowls of chowder.  It's something that both kids and adults will enjoy!


Thursday, January 19, 2012

DIY Stained-Glass Window Art

I saw this idea on a TV show several years ago and recently remembered it.  You start with these plastic sheets (I got mine at Hobby Lobby, in the same aisle as the candle and soap making supplies), black puffy paint, and a coloring page.  I chose Elmo because he is a character that my daughter happens to like, and he is fairly easy.  Only 2 colors, and not a lot of detail.  I highly recommend starting out with a very easy design.  You can look through coloring books to find an image, or you can just google "Elmo coloring pages" or any kind of coloring pages, for that matter.  I think it's better to google an image because that way you have a lot more choices.


Take the plastic wrap off both sides of your plastic sheet.  Tape the coloring page under the plastic sheet.  Using a steady hand. trace around the design with puffy paint.


Let dry for several hours.

Once dry, mix Elmer's glue with food coloring in the colors you will need.  I only needed orange (for the nose) and red.  I used a section of an egg carton to mix up the colors. 


Use Q-tips to apply the colored glue to the design.  Let dry for several hours.  Then, hang in a window for all to see!


Homemade Condensed Soup Mix

In the past, I have made my own cream of mushroom soup and cream of chicken soup.  It's much healthier than the canned versions.  But then I would run out quickly and never find the time to make more.  I recently discovered that there are recipes out there for a powdered condensed soup mix.  Who knew?  Not me, that's for sure.  I was really excited to find this recipe on my favorite site for recipes, Allrecipes.com.  I was even more excited to figure out a way to make it even healthier.  Here is the original recipe:


Ingredients
  • 2 cups nonfat dry milk powder
  • 3/4 cup cornstarch
  • 2 tablespoons dried minced onion
  • 1/2 teaspoon ground black pepper
  • 1/4 cup chicken bouillon powder
  • 1 teaspoon dried basil (optional)
  • 1/4 teaspoon dried thyme
Directions
  1. Using an air tight container combine dry milk, cornstarch, onion flakes, pepper and chicken bouillon. If desired also add basil and thyme. Mix well and store in the refrigerator or freezer.
  2. When using the mix combine 1/3 cup of the mix with 1 1/4 cups of water in saucepan. Cook and stir until thickened.               


I swapped out the cornstarch for almond flour.  Cornstarch has way too many carbs for me.  I would have swapped out the dried milk for something lower-carb, but I couldn't think of anything.  This recipe makes enough for about 9 "cans" of soup.  When I was gathering the ingredients to make it, I wanted to make a double batch, but I didn't have enough ingredients, so I decided to make just one batch.  Turns out I read the recipe wrong and added 3/4 cup of chicken bouillon powder instead of 1/4, so I had no choice but to go to the store and get enough ingredients to make a triple batch.  I had enough to fill 2 4-cup containers and then some.  That should last me for awhile, and that makes me happy!  Takes up less space in my pantry than those cans, and it is WAY healthier.  Here is the nutrition information for the canned cream of chicken soup vs. mine:

Canned Cream of Chicken Soup (Note: this is the 98% fat free version)
Nutrition Facts (Per Can)
Calories: 200
Total Fat: 6.25 g
Saturated Fat: 2.5 g
Sodium: 2000
Total Carbohydrate: 30 g

Homemade Condensed Soup
Nutrition Facts (Per Can)
Calories: 108
Total Fat: 4.7 g
Saturated Fat: 0
Sodium: 475 mg
Total Carbohydrate: 10.5 g

So you can see there is quite a difference.  I made a "can" of the condensed soup (as pictured above) to use in our dinner tonight.  I can't wait to see how it tastes!

*UPDATE*
I made dinner using my homemade cream of chicken soup, and surprisingly, it tasted way better than usual!  I don't know if it was my homemade substitution or if I did something different without realizing it, but it really was a lot better.

Wednesday, January 18, 2012

Potty Training Candy Jar

We are potty training our 34 month old daughter right now.  She is doing really well so far.  She was really stubborn about it for a long time, but we finally decided to jump in with both feet and get it over with.  We have been using M&Ms as positive reinforcement, which I'm sure you know is a very important part of potty training.  The problem we were running into was, "Yay, Angie went pee pee on the potty!  Where are the M&Ms?"  And we would scramble to find them.  Either that, or we would have an opened package of M&Ms just laying around in the bathroom, which I didn't like either.  I don't know that I like the idea of food in the bathroom, especially if it's just laying there in an open package.  So I came up with this idea:


A jar of M&Ms to keep in the bathroom.  I just cleaned out an old candle jar and poured in a bag of M&Ms.  That way, they are right there when we need them in an enclosed container.  I don't mind keeping them in the bathroom as long as they are in a jar with a lid.  Now they are easily accessible so we can give positive reinforcement right away.  Not to mention it looks pretty cute with my other bathroom decor!


What methods have you used for potty training that have been effective?