Sunday, April 29, 2012

Easy Shirt Makeover

This weekend I discovered something and I'm not sure why I didn't before.  I have always seen these packages of Rit fabric dye, but I never really thought anything of it.  I finally put two and two together and realized that I can change the color of just about any item of clothing or accessory.  My life will never be the same! 
A few years ago, I got this sweater from Old Navy's winter clearance.

It's very nice.  It's soft and warm and well made.  But it has hung in my closet the last few years for one reason and one reason only:  the color.  Or lack thereof.  It doesn't go with anything I own, and I never wear it.  I was going to get rid of it this year.  I actually had already put it in the garage sale pile.  But then I remembered those fabric dyes.  And I remembered how earlier this fall, I really wanted an orange sweater but couldn't find one anywhere.  Light bulb!  I soooo wish I would have thought of this sooner, instead of at the end of the spring when it's going to be too warm to wear sweaters any day now. 
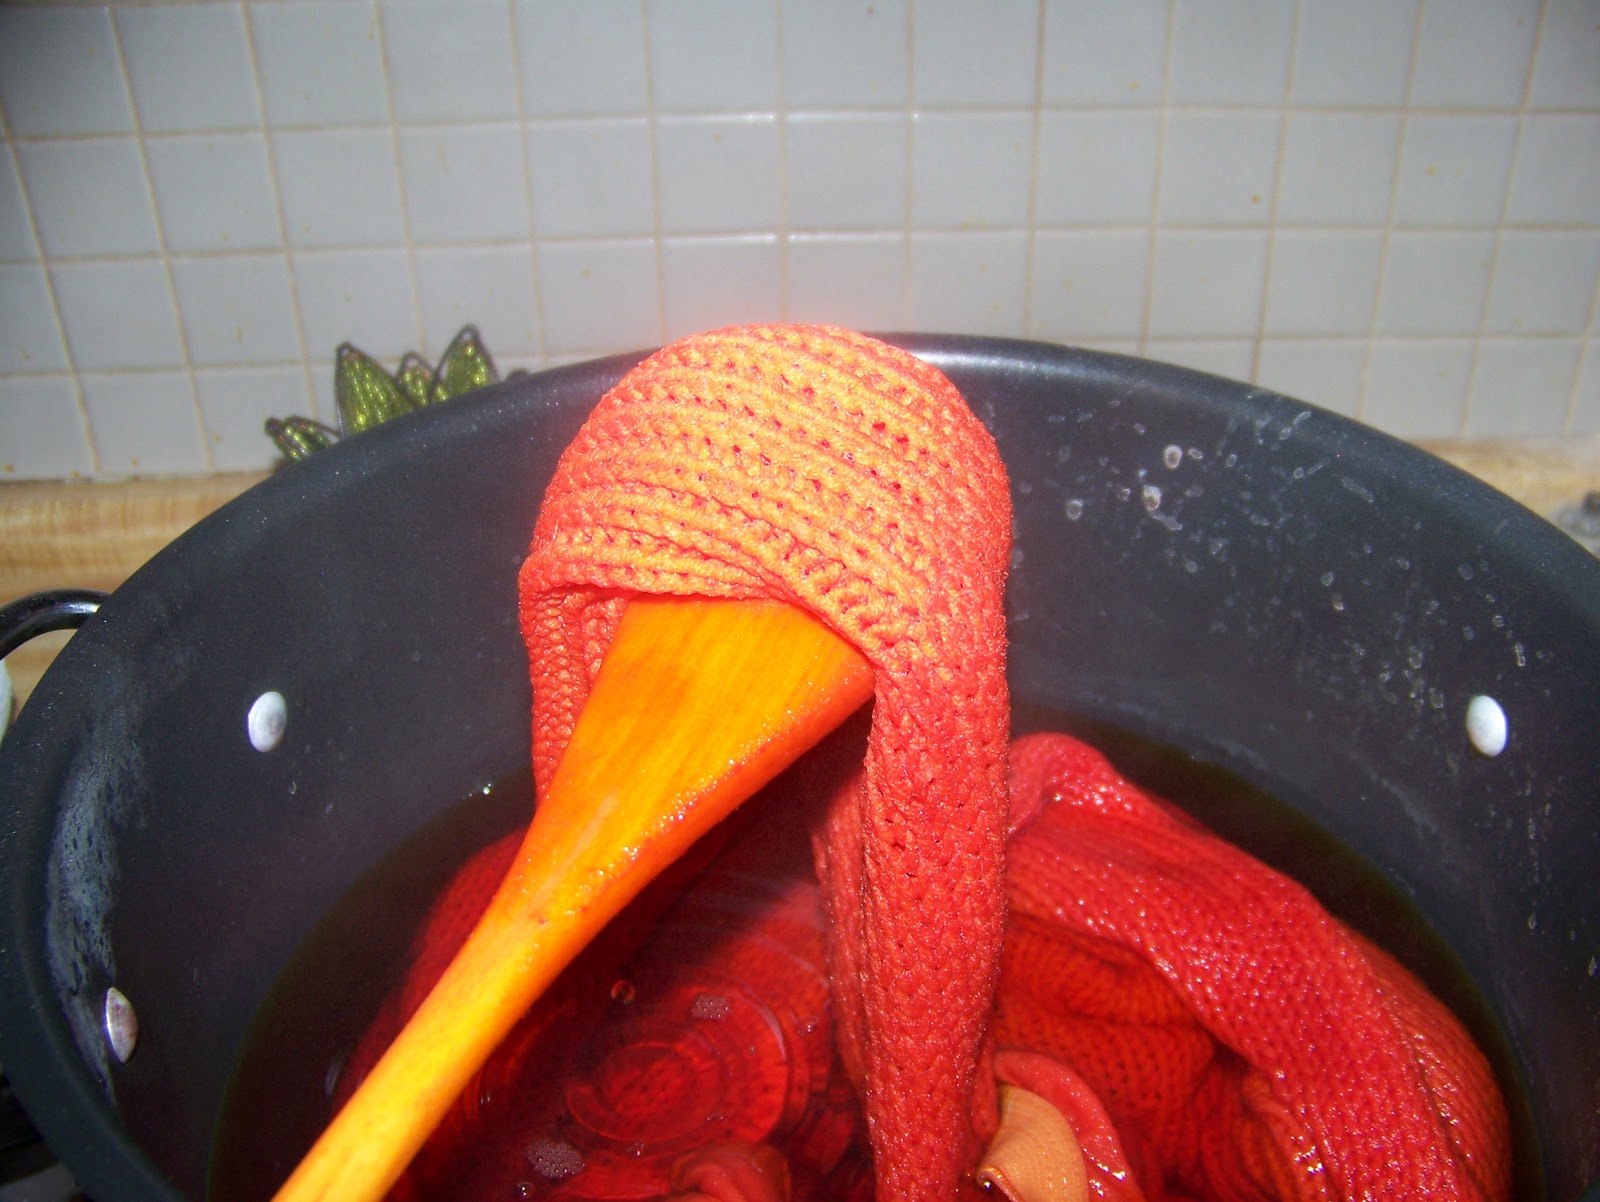
I have this large stockpot that I only use for making laundry detergent and liquid hand soap.  Since I don't use it for cooking, it was perfect for this project.  Anyway, the directions for dying are printed on the inside of the package, but basically you fill a large stockpot with hot water, then add one cup of salt, one tbsp of laundry detergent, and the package of dye.  This should go without saying, but you must use extreme caution when dying fabrics.  Wear old clothes and rubber gloves and be very very careful not to splash or spill anything.  Add your items to the pot, and use a wooden spoon to submerge them.  Along with my sweater, I threw in 2 pairs of white cotton undies just for fun.  Then carefully stir for 15-30 minutes while simmering on medium-low heat.

When it's done, take the entire pot to a laundry room/utility sink and dump out the dye water.  Using rubber gloves, rinse your items with warm water.  Gradually lower the temperature of the water until you are rinsing with cold water.  Keep rinsing until the water runs clear. 
Throw your items in the washer.  Then either put them in the dryer or hang to dry.
I was so happy with the results:
Now I have my beautiful orange sweater that I have been wanting for months!  And it only cost me $2.29 that I paid for the box of dye.  My husband loves it too because orange is one of his favorite colors.  I just hope I get a chance to wear it before it gets permanently warm.  I was planning to wear it to church today, but Angie woke up very sick and throwing up so we didn't get to go. 
I was so excited about my new found clothing-transformation trick that I had to go through all of mine and Angie's stuff to find more things to dye. 

Angie just received this white cotton hoodie in a bag of hand-me-downs.
I asked her if she wanted me to turn it pink and she got very excited and yelled yes!  But I decided to do something a little different with hers.  I tied it up tightly with yarn first:
And this is how it turned out:

She loves it!  I will definitely be doing this again soon.  It's only a matter of time before I find more boring, drab items that need makeovers!

Wednesday, April 25, 2012

Weight Loss Wednesday: How to Wean Yourself Off of Caffeine


I have never been an out-of-control pop drinker, but I usually drink 1-2 cans per day.  Until recently.  I had tried to stop drinking pop altogether a few times before, but after about a day and a half with no caffeine, I would get these terrible headaches.  I had always heard rumors that quitting pop, even diet pop, can not only improve your health, but help with weight loss.  I always figured it's not that big of a deal, I'm drinking diet so it's not like I'm consuming empty calories plus tons of sugar.  Well, recently I decided that I will take the plunge and stop drinking pop, just to see if it makes a difference.  How did I do it?  Well, I couldn't just quit cold turkey because of the headache problem.
Here's what I did:  Since I would drink an average of 1-2 cans of pop per day, I used 2 cans as a starting point.  For one week, I drank one can of pop per day, and only one.  The next week, I measured out and drank 6 oz of pop (one can is 12 oz so 6 oz is half a can) per day.  The next week, I went down to 3 oz of pop per day.  And then from there, I drank 3 oz every other day for one week.  I ended up marking a disposable plastic cup with a permanent marker, one mark for 6 oz and one for 3 oz.  That way, I didn't have to keep getting my measuring cups dirty every morning.

And now I am free of my caffeine addiction!  You can do it too.  Just figure out how much caffeine you are drinking/eating each day, and start decreasing by half.  From what I have read, you don't really need to continue each step for a whole week.  You can do each step in three days.  I just decided that for me, it would work better to give myself plenty of time.    

Friday, April 20, 2012

DIY Cooking Spray

So I have seen this on Pinterest and I thought I would give it a try.  Seemed easy enough.  You make your own cooking spray by mixing 1 part oil with 5 parts water.  It is healthier than Pam, it is much cheaper, and it is environmentally friendly because it keeps aerosol cans out of the landfills.

Start with a bottle of oil and a clean spray bottle.  I don't recommend reusing spray bottles from cleaning products for obvious reasons, but you can pick up an empty spray bottle at most grocery stores and big box stores.
My bottle held about 2 cups, so I did the math and calculated the 1 part to 5 parts= 1/3 cup oil and 1 2/3 cup water.  Use a funnel to pour them into the bottle.
Label your bottle so you and everyone else in your house knows what it is.  Then what you have is your very own refillable bottle of cooking spray.
As we all know, oil and water don't mix, so the oil will sit on top of the water.  So you will need to give it a good shake before each use.  And I mean a good shake.  The oil and water separate very quickly, so make sure you get your sprayin' in right after you shake it up.
I calculated the cost of the DIY cooking spray at $0.66.  Well, technically, there was a one-time cost of $1.49 for the spray bottle, but since it's a one-time cost, I didn't include it in the total.  I used extra virgin olive oil, so depending on what type of oil you use, it could be more or less.  Compared to $2.39 for a can of Pam, it's a steal!  Also, my can of Pam had 6 oz in it while my homemade cooking spray has 16.  That's a cost of $0.40 per ounce for the Pam, or $0.04 per ounce when you make your own.  One more thing I don't have to buy anymore!


Monday, April 16, 2012

Sugar Free Pumpkin Muffins

I have been seeing a lot of recipes lately with healthy ingredients substituted for oil and eggs.  Like applesauce or pureed black beans.  I know I have seen a recipe for brownies using canned pumpkin, but I wasn't so sure about how the chocolate would taste with pumpkin mixed in.  I have tried making brownies with applesauce instead of oil in the past, and they tasted kind of funny.  So I opted for pumpkin muffins.  And I used a sugar free cake mix, making them even more healthy!

This recipe has 2 ingredients:
Sugar Free yellow cake mix and 1 15 oz can of pumpkin

Put the 2 ingredients in a bowl and mix.  Add some cinnamon and pumpkin pie spice if you wish.  The batter will be very thick.  I used a regular hand mixer, but I think next time I will use my stand mixer so I can use dough hooks.  Line a muffin tin with cupcake wrappers and fill 3/4 full.  Cook according to package directions (should be about 19-22 minutes).


Sunday, April 15, 2012

Weekly Menu Plan 4/16

As I mentioned in my last post, I have been much shorter on time lately.  I do, however, have a few projects in mind that I hope to start soon.  This week is a very busy week already.  Besides having a full work week, I have something on the calendar almost every day.  One thing I am thankful for is my weekly menu planner, which has made meal planning much, much easier.  It has saved me so much time and money.  It makes planning a week's worth of meals so quick and easy, and it allows me to easily plan meals around what I already have. Sometimes I even plan ahead to use leftovers from one night for another night's meal.  Here is my meal plan for this week.  All of them are fast and easy, which takes the extra stress off me as I'm expecting a very busy week.  One less thing I have to worry about each night.

Monday:  Chicken salad
Tuesday: Crockpot chili
Wednesday: Tuna burgers
Friday: Tacos (as always)
Saturday: Frito Pie using leftover chili
Sunday: Bourbon Chicken with Chinese vegetables


Saturday, April 14, 2012

Grown Up Mac 'N Cheese

I apologize I haven't had nearly as much time to devote to this blog lately.  My (paying) job is now demanding much more of my time so I haven't had as much time to make new recipes and projects, much less post about them.
However, this is something that I have recently discovered as a result of having to quickly make and eat fast lunches.  Macaroni is currently one of my daughter's favorite foods, which is fine by me because now we have 4 different main course options to serve her instead of 3.  I have been buying the Kraft Easy Mac pouches.  (Which, by the way, I won't be doing anymore since I just had another DUH moment today and realized that the boxes are much cheaper).  I usually make one, give her half of it, then save the other half for another meal.  But then I found myself making them for my own lunches.  When you work at home and don't have to plan your lunches ahead, you learn to be creative and eat what you have.  Anyway, after eating Easy Mac pouches for lunch for a few days, I started to get a case of the Macaroni Blahs.  It was just a little bland for my taste.  So I started thinking about what I could do to easily and inexpensively add some flavor to it. 

So I decided to try making taco macaroni.  I wanted to give it some taco flavor, but I didn't want to overpower it so that I couldn't taste the macaroni and cheese.  I played around with it, and the best balance of flavor was 1/4 tsp taco seasoning per Easy Mac pouch, or 1 tsp per box of macaroni. 
Make the macaroni according to the package directions, and then add the taco seasoning when you add the cheese powder.

It makes all the difference!  This is a great way to jazz up macaroni for an adult's palate.  Heck, even some kids may like it.  I really want to try it with ranch dressing mix too, but I like it so much with the taco seasoning that I haven't tried it yet!

Sunday, April 8, 2012

Repurposing Easter Baskets


My daughter received a pre-filled Easter basket as a gift today.  She loved the princess stuff inside of it, but then we were left with the basket it came in.  She already has an Easter basket, and the baskets that they use with the pre-filled Easter gift baskets are usually not very high quality and not meant to be a kid's main Easter basket.  As always, I started to think of other ways I could use it.  I didn't see a need for another Easter basket, and I didn't see a point in keeping something that would just take up space without serving a purpose.  Just as I was about to toss it, I thought, No, I can't use another Easter basket, but I can always use an extra basket.  So here comes another DUH moment:
I used some heavy duty kitchen scissors and cut off the handle.
Now it's just a basket.  And now I have a nice little container sitting on my bathroom sink to corral loose items.  I was pretty proud of myself for that one.  Not sure if I should be since it was one of those DUH ideas, but it always makes me happy if I can turn would-be trash into something useful.


Using Up Leftover Easter Eggs


Happy Easter to everyone!  I was just starting to wonder what would be the best way to use up all these leftover Easter eggs.  Unfortunately, I am the only one in my family who eats hard boiled eggs.  And I really don't want to eat all of them myself.  That would get old fast.  I considered making some of my world famous devilled eggs, but I am the only one who eats those too.  I don't have a problem with that, but I figured it would be better to use them to make a meal or two that everyone can eat.  I love me some devilled eggs, but easy and cheap meals make me happy since they make my life easier!  So I decided to make a double batch of tuna salad.  And I am incorporating it into our menu two nights this week.  Here is my menu plan for this week:

Monday: Tuna salad (as in lettuce with tuna salad on top)
Wednesday: Leftover Ham and mashed potatoes
Thursday: Out to eat for Michael's birthday
Friday: Tacos
Saturday: Tuna melts
Sunday:  Parmesan crusted tilapia with mixed vegetables

Wednesday, April 4, 2012

Never Clean Your Fridge Again

I really hate cleaning my fridge.  It's one of those things that doesn't get done nearly as often as it should.  It involves standing in front of the fridge with the door open, scrubbing for an extended period of time.  Then when you get to the bottom, you have to kneel down and scrub.  At some point, the light bulb burns out from being on too long.  But luckily, I recently saw this idea on one of those "helpful hints" websites.  Strangely, I did not find it through Pinterest, and even more strangely, it was unpinnable.  So I decided to try it myself and post about it.

All you need is a roll of Glad Press 'N' Seal plastic wrap.  You will want to start by removing the shelves in your fridge, if possible.  I did mine one at a time, which does make it a much longer process, but the alternative was to leave all of my food unrefrigerated for 1-2 hours. 
Wash each shelf thoroughly.  Dry them with a towel, but then also let them sit until completely dry.  With the first shelf, I made the mistake of towel drying it and then immediately covering it with the plastic wrap.  It wasn't dry enough, so it didn't stick.  So just have a little patience.  Here are some before pictures:

And after covering them with the Press 'N' Seal:
Nice and clean!  And, the next time it gets dirty, all I have to do is peel off the plastic and replace it with clean plastic.  Just one more thing to make my life easier. 

If you haven't already, make sure to like my page on Facebook so you don't miss any new projects, recipes, and ways to make life easier!