Sunday, July 29, 2012

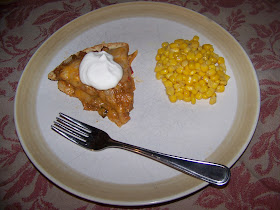
Taco Pie

I recently found a new recipe for taco pie and decided to give it a try.  It calls for a pound of ground beef and a packet of taco seasoning, but I explained in my previous post that I use ground turkey and homemade taco seasoning when making tacos.  I also mentioned that in our house, we eat tacos every Friday night, and therefore we always have a lot of leftover taco meat.  I shared my recipe for taco soup, but it gets a little old after awhile, plus it's nice to have other things to use the leftovers in.  This recipe is awesome for using up leftover taco meat.  But anyway, here's how to make it:

INGREDIENTS


1 lb ground turkey or beef
2 cups of Mexican blend shredded cheese (or any flavor cheese)
3 8-inch tortillas
1 packet taco seasoning (or 2 tbsp homemade taco seasoning)
1/2 cup salsa con queso
Sour cream for garnish

INSTRUCTIONS

1.) Preheat the oven to 350 degrees
2.) (Skip this step if you are using leftover taco meat). Brown the ground turkey/beef in a pan and pour off the grease.  Mix in taco seasoning and 1/2 cup water. 
3.) Add the salsa con queso to the meat and stir.
4.) Spray a pie pan with nonstick cooking spray (or you can make your own). 
5.) Place one tortilla in the bottom of the pan.
6.) Spread 1/3 of the meat mixture on top of the tortilla.
7.) Cover the meat mixture with cheese.

8.) Repeat steps 5-7 twice.  You will have 3 layers.
9.) Place in the oven and bake for 15-20 minutes.
10.) Remove from the oven and allow to cool.  Slice and serve with sour cream and/or salsa on top.

This is a really quick and easy dinner.  It's especially quick if you use leftover taco meat, but still quick if you make it the same day.  I'm always happy to find another quick and easy meal option!


Saturday, July 28, 2012

Homemade Liquid Hand Soap

I started making my own liquid soap a little over a year ago.  There are several bloggers who have posted tutorials on how to make liquid soap, but I originally found the instructions here.  If you have been following my blog, I promised in a previous post to share my method for making your own liquid soap.  I know it has been awhile, but I never break a promise, so here it is!  (Better late than never).
This method for making liquid soap is very similar to my recipe for homemade laundry detergent

Materials:


1 bar of soap
2 tbsp liquid glycerin (optional)
Cheese grater
Large stockpot
Mixing spoon
Measuring cup
Large funnel

*You will also need something to pour the soap in once it is finished.  I happened to save some containers from the 64-oz soap refills that you can buy at the store.  Two 64-oz containers are the perfect size for one batch of soap.  If you don't have any, you can also use empty gallon milk jugs.


Instructions:

Grate your bar of soap into a bowl.  BTW, you can use any brand of soap you want, but I like using the fancy kind.  It still costs next to nothing.  I love the smell of Yardley Oatmeal and Almond, and it often goes on sale at Walgreens for $0.69.
Meanwhile, pour 20 cups of water into your stockpot and start heating it.  It will take some time to grate the soap.  It took me about 15-20 minutes to grate an entire bar.

Once the water is heated to a simmer, pour the soap flakes in.


Stir until the soap flakes have dissolved.  This shouldn't take long.
Add the glycerin if you are using it.

Remove the stockpot from the stove.  At this point, it will not look like soap at all.  Don't get discouraged; it will congeal as it cools.  With that being said, you will want to let it cool before pouring it into the containers; however, you won't want to let it cool for too long or else it may be too thick to pour. 
Let it cool for an hour or two.  Then stick a large funnel in your containers and carefully pour the soap in.  I highly recommend doing this step in the sink. 

Again, at this point the soap will still be very watery.  It takes 24-36 hours for the soap to congeal completely.  Another warning I should probably give you:  This soap does not have the same consistency as the kind you buy in the store.  It's a little... different.  I'm not sure how else to describe it, but it works for me.  It gets your hands clean, and that's the most important thing.

So here's the breakdown: I spent $0.69 on the bar of soap.  I already had the bottle of glycerin, but I think I paid around $2.50 for it.  So it cost me under $1 to make 2 64-oz bottles of soap that would have cost $6 each had I bought them in the store.  That's a savings of $11.  And this will probably last me 6 months, maybe more.  BTW... if you are interested in more ways of saving money on hygiene, read about how to make washcloths out of recycled plastic bags here.  They work great and cost absolutely nothing.

And on a related issue... do any of you remember my bottomless soap dispensers?  Here's an update on that.  I posted about the bottomless soap dispenser on May 1st.  I mentioned in the post that I probably wouldn't have to refill it for several months.  Well, today is July 28th and it just ran out.  So if any of you were wondering, the bottomless soap dispenser lasts for almost exactly 3 months (for someone who washes her hands a LOT).  That means I will have to refill it 4 times a year instead of once every 2 weeks.  I am super happy about that!


Friday, July 27, 2012

2 Ways to Kill Weeds


I have a brick patio, which looks really nice, but weeds are always growing between the bricks, which makes it look not so nice.  I recently discovered a couple different ways of getting rid of them without having to kneel down and try to dig them out from between the bricks. 

Method #1: Boiling Water

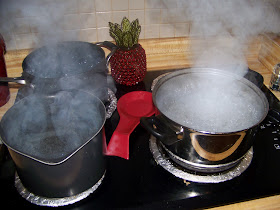
Fill 3 or 4 of your largest pots with hot water and heat them on the stove until boiling.

Put on oven mitts, long pants and shoes (not open-toed).  Trust me, no matter how carefully you think you can pour the water, you will need to wear them.  Very carefully carry the pots outside, one by one, and slowly pour them over the weeds.  They will be dead within an hour or two.

Method #2:  Mix up Your Own Weed Killer

This is made using stuff that just about everyone already has in their house.

Mix together:
2 cups vinegar
1 tbsp salt
1 tbsp liquid soap


Pour ingredients in a spray bottle and shake it up.  Spray directly on the weeds. (Make sure not to spray on plants or grass, it will kill them too.)

Here is the "after" picture:

See all those dead weeds?  SO much easier than digging them out by hand.


Each method has its pros and cons, but they both work well.

The Boiling Water method is absolutely free and 100% non toxic; but it can be dangerous to work with boiling water, the weeds grow back quickly, and it is more time consuming than the weed killer method.

The Weed Killer method is very low in cost, mostly non toxic (other than a small amount of liquid soap), takes very little time, and kills the weeds so they stay dead.  However, it does have a minimal cost and could be somewhat toxic.

I like to keep a bottle of the homemade weed killer in my garage so I can spray the weeds as soon as they pop up.  How do you deal with weeds in your yard?


Wednesday, July 25, 2012

DIY Flats


I have been working on these for quite awhile.  Hopefully that explains the lack of posts in the past couple of weeks, because ladies, this is big.  I have created a pattern (yes, I created it myself!) that allows you to easily and inexpensively create your own shoes in any color.  I really wish I would have discovered this sooner.  I am the kind of person who hates wearing shoes, and in the summer I only wear flip flops.  Back before I worked at home and had to work in an office every day that didn't allow flip flops, well, let's just say I wasn't a happy camper.  This is a way to kinda sorta get away with wearing flip flops in places that don't allow them.  Not to mention these would make great pregnancy shoes for swollen feet! These are lightweight, comfortable shoes that you can easily slip on and off. 
Let's get started.  You will need:

1 pair of foam flip flops (Old or new... you can get a new pair for $1-2)
Size 5 knitting needles
Stitch holder
Small amount of yarn in cotton or acrylic

Make the tops
This is a beginner level knitting pattern, so if you know how to knit at all, you should be able to make these.  And it goes very quickly, too.

(Make 2) Cast on 8 stitches. 
Row 1: Purl across
Row 2: Knit one, increase one, knit to the last stitch, increase one, knit one
Repeat rows 1 & 2 until you have 24 stitches.
*Note... if you have wide feet, you may want to increase to 26 or 28 stitches.*
Knit 16 rows in stockinette stitch.
Starting with a right side row, knit 8, loosely cast off 8 (or 10 or 12 if you made them wider), knit 8.
Purl next 8 stitches and put the other 8 on a stitch holder.
Knitting in stockinette stitch, begin decreasing one stitch on the inside edge every row until you have 2 stitches left.  Bind off.
Put the remaining 8 stitches on the needle.  Join yarn and repeat the same steps as the opposite side.
Weave in loose ends.

Now you should have 2 tops that look something like this:

I thought the solid color looked too plain and boring by itself, so I knitted some cute little flowers to decorate them.  You can leave them plain, or add whatever embellishments you want... flowers, bows, jewels, etc.
After attaching the flowers, the tops were ready to attach.


Attach the tops
Before you attach the tops, you will need to prepare the flip flops.  Cut the tops off at all three points.  I saved the little "buttons" that I cut off the bottoms and glued them back in.  That way, the holes are plugged up so nothing wet or yucky gets on your feet.
For this step, you will need a good needle.  One that is sharp enough to go through foam, but also has an eye that is small enough to go through foam and large enough for yarn to go through.  Make sense?  I used an upholstery needle.
Thread the needle with a length of yarn.  Line the top up with the toe of the flip flop.  I found it easiest to start at the toe and sew all the way down to the edge, then start another length of yarn on the other side of the toe and then sew down to the other edge. 
You will want to sew down through the knitted top, diagonally through the edge of the flip flop.  Make sure not to sew too close to the edge, or else the yarn will rip through the foam.

Don't worry about those ugly-looking stitches on the edges of the shoe.  We'll take care of those in the next step. 
Sew all the way around until the top is completely attached.  Repeat with the second shoe.


Finish it up
Now you're almost done.  We still have the problem of the ugly stitches on the edges of the shoe. 

See?  No one wants that.

You will need some decorative trim, some heavy duty glue, and some straight pins.

Cut a length of trim that will go all the way around the shoe, plus an inch or so.  Starting at the back, glue it in place, pinning it as you go.

(It's hard to see in the picture, but there are actually pins holding the trim in place as it dries.)

Make sure to glue the trim down thoroughly, and make sure to cover up the stitches with your trim.

The drying time will vary based on what type of glue you use.  Mine were pretty much dry within 15-20 minutes, and completely dry within an hour or two.

Ta-da!  No more ugly stitches showing.

And that's about it.  Here are just some of the benefits to making these shoes:

- Easy to make
-Quick to make (these were finished within a few hours)
- Versatile (can be made in any color)
-Cheap (it cost me under $3 to make one pair)
- Cute
-Customizable
-Comfortable
-Convenient (slip on, slip off)


I have a feeling I will be making a lot more of these.  In fact, I am working on my third pair!  Just think about all of those times you had a great outfit but no matching shoes to wear.  Problem solved!  As long as you leave yourself enough time, you can make shoes to match with anything.
And, if you have a little extra time and yarn, why not make yourself a matching necklace too?


Saturday, July 14, 2012

Recycled Can Pencil Holder

This is a really easy way to make a cool pencil holder for your desk.  Just save a tin can, then peel off the label and wash it with soap.  Then pick up a bag of glass gems at your favorite craft store (found in the floral section). 

The only other thing you'll need is a hot glue gun.  Heat up that bad boy and start gluing the gems on until the can is covered.  That's all there is to it.  And you just scored a cute pencil holder that you can display on your desk or give as a gift.


Tuesday, July 10, 2012

Ticket Stub Memory Box


This is another Pinterest-inspired idea that I just had to make.  I always try to save all of my ticket stubs, whether it's for concerts, movies, theme parks, museums, etc.  But I usually just keep them in a drawer.  I have always wanted a better place to keep them, preferably a place where I could display them.  This is an easy solution to the problem.

I started by buying an 8x10 shadow box at Hobby Lobby.  These go on sale often for 50% off.

Then I picked out some scrapbook paper to put in the back of the shadow box as a background.  I cut it down to 8x10, then I printed the word "memories" at the top using my printer. 

I also got my dad to cut a slit in the top of the shadow box to make it easier to drop tickets in.  I would have done it myself, but I lack the tools and the knowledge of how to use them.
This step is optional since you obviously can just open the back of the frame to put tickets in, but it's just way easier to drop your ticket stubs in the slit than go through all that work.
So I took all my old tickets that I had been saving:

And dropped them in the shadow box...
And hung it on my wall!  Now I have all of my ticket stubs hanging on my wall to remind me of the happy memories I made.  And whenever I get a new one, I can just drop it in with the others!


Sunday, July 8, 2012

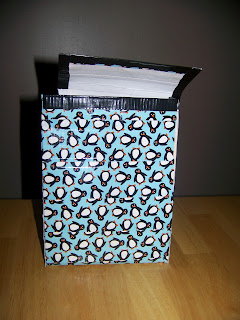
DIY Duct Tape Lunch Bag


Didn't I tell you there would be lots more duct tape projects?  I hope you're not getting tired of duct tape, because let me tell ya, it really is addictive.  The more you make using duct tape, the more ideas you get for other duct tape projects.  Back to school is just around the corner, so if your child needs a new lunch bag, this a great project to make!
I was inspired to make a lunch bag by this duct tape purse that I made last week.  I am really proud of this one because I came up with the idea and the instructions 100% by myself.  I found lots of cute duct tape patterns on my recent trip to Hobby Lobby, particularly some penguin duct tape that was perfect for a lunch bag. 

You will need:
2-3 colors of duct tape
ruler
scissors
pen
stick-on Velcro

Choose one color/pattern for the main color.  You will need another color for the inside lining, and then you can either use the same color for the trim or choose a different one. 
For these instructions, I will abbreviate each color as such:
Main color: MC
Liner color: LC
Trim color: TC

Start by cutting 6 1/2 inch strips of your MC.  Start overlapping them as shown:

Keep overlapping pieces of tape until you have a strip that measures approximately 6 1/2 by 25 inches.  Then take your LC and start cutting 6 1/2 strips.  Start by laying the first piece about 1/2 inch from the first piece of your MC, sticky sides together.  Keep laying pieces of tape on top of the MC piece, overlapping them the same way you did on the other side.
Keep going until you have the piece completely covered, stopping about 1/2 inch from the end.  Fold the sticky edges over.  Then trim the edges so the piece is 6 inches wide and 24 1/2 inches long.
Next, make the side pieces. *Cut 3 pieces of your MC, 8 inches long and overlap them the same way you did on the main piece. Cut 3 pieces of the LC and overlap them on the other side the same way you did on the main piece.
Trim the piece so that it is 8 inches by 4 inches.  Then take a ruler and a pen and make a mark along the top at the 1 inch mark and the 3 inch mark.  Using the ruler, trace a diagonal line from the 1 inch mark to the bottom left corner, and then from the 3 inch mark to the bottom right corner.  Cut along the 2 lines that you just drew.  Then you will have not a triangle, but sort of.  I guess technically it's a trapezoid.  The bottom of the piece will still be 4 inches but the top will be 2 inches.**

Repeat from * to **.

Now that you have your main piece and the 2 side pieces, all that is left to do is put them all together.

Lay your main piece and side pieces down with the lining side up.  Measure 8 inches from the edge of the main piece and make a mark.  Do the same on the other side.  Then take your side pieces and place them with the bottom edge up against the main piece where the mark is.  Tape them down using the LC.  (I know my instructions probably sound confusing, but hopefully the picture will show you what I mean.)
Then, what you need to do is tape up the sides of the side pieces to the sides of the main piece.  Start by taping the inside.  Cut an 8 inch piece of tape in the LC.  Fold it in half, sticky sides out.  Place it along the edge of the side piece, with the fold along the edge.  Fold the edge of the main piece up, pushing it up against the other side of the tape connected to the side piece.  Repeat this step on all 4 sides.  You may need a helper to hold the bag up while you tape (I did.)
This is my bag with 2 of the sides taped up:
And with all of the sides taped up:

Now you're almost done.  Start by cutting 2 8 inch strips of your LC.  Cut them in half lengthwise.  Use them to tape up the side edges between the main piece and the side pieces.  Then cut a 4 inch piece of LC and cut it in half lengthwise to tape up the bottom edges.  Cut more strips of the LC as needed and cut in half lengthwise to tape up any remaining edges.  Take the stick-on Velcro and place one piece in the middle of the flap, and then put the other piece opposite it on the top middle of the front of the bag.


Ta-da!  Now you have a super cute, super durable lunch bag!  Your child (or you) will be the envy of the lunchroom!


You may also like: Duct tape wallets and Duct tape purse

Saturday, July 7, 2012

DIY Flat Iron Cover

I use a flat iron on my hair every day.  After I am done using it, it sits on the bathroom sink to cool off, usually for several hours, sometimes all day.  And that is because if I can't put it away right away, it may not get put away at all.  I have been looking for a flat iron cover for it for a long time but I haven't found one that I like and that is a reasonable price.

This idea has been floating around Pinterest lately.  It was one of those things I pinned with the idea that I would do it one day, but wasn't sure if I ever would.  I have been keeping an eye out for cool potholders but until today haven't find one I liked.  I went on a shopping spree at Hobby Lobby today and found this cool animal print potholder (For some reason I have a thing for animal print accessories right now).  I snatched it up and brought it home.  I folded it in half, took a needle and thread and sewed it up.  In less than 10 minutes I had a new flat iron cover.
It was super easy to make.  No fancy sewing skills required.  And now I can put my flat iron away so it won't sit on the bathroom sink all day.  Problem solved!


Friday, July 6, 2012

Pineapple Whip

Since we are well into picnic season, I thought I would share one of my favorite healthy dessert recipes.  It's really tasty and easy to make.  I don't know about you, but I absolutely despise those dreadful jello salads with fruit in them.  This is a great alternative to jello salad. 

There are only three ingredients:

One 12 oz container of whipped cream
One 20 oz can of pineapple tidbits in juice
One 3.5 oz package of pistachio pudding mix


I recommend making a double batch - I always do!


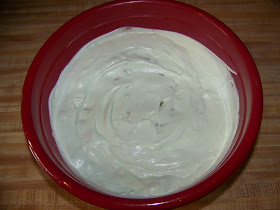
Start by putting the whipped cream in a large bowl.  Crack open your can of pineapple and drain the juice into the bowl (do not pour the pineapple in yet).  Empty the pistachio pudding mix into the bowl and mix well.  Then add the pineapples and mix again.

For best results, let it chill in the fridge for a few hours.

Then dish it up and enjoy!