Thursday, March 29, 2012

Save by Making Your Own Breadcrumbs

Lately I have been doing a lot of re-evaluating.  Trying to figure out what we really need to spend money on and what we can do without.  One of the ways I have been doing this is thinking of ways to replace items we would normally buy with something cheaper, or better yet, free.  If you have been reading my blog, you may have noticed that I have a lot of "duh" moments.  This is one of them! 
 I made meatloaf this week and used up the last little bit in my canister of breadcrumbs.  So I added breadcrumbs to my grocery list.  But then I remembered seeing this post awhile back on one of my favorite blogs, SavingsLifestyle.com.  I always throw the leftover heels away from loaves of bread.  Duh!!!  Instead of throwing bread away and buying more bread (in crumb form), perhaps I should use the bread I already have and convert it into crumb form.  I'm not sure why I didn't do that before.  Maybe I didn't realize how easy it is to make breadcrumbs.  Also, don't stop with heels.  Any leftover, unwanted hot dog or hamburger buns work too.  There are 2 ways to make them.  You can either let the bread sit out for a couple of days until it's good and stale.  Or, just stick 'em in the toaster...
Let them cool off enough to handle.  Then crumble them up in a bowl.
As you can see, crumbling them up yourself isn't enough, so start adding them to a food processor, a little bit at a time.
Process the bread until you have fine crumbs.  Then label a Ziploc bag (I didn't add a date because I plan to add to it each time I get more bread heels) and fill with the crumbs.  Store them in the freezer.

That's one less thing I have to buy!  I hate being wasteful, so it's really exciting to me when I find a way to use something that I would have thrown away.


Sunday, March 25, 2012

Clothes Hanger Toilet Paper Holder


Tonight I saw a picture of something similar to this on Pinterest.  When I followed the link, the site was written in Spanish, but it didn't look too hard to figure out.  All you need is a wire hanger.  It helps to have needle nose pliers and possibly a ruler or measuring tape too.
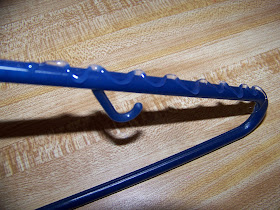
Start by stretching your hanger out into a circular shape.  You will then morph it from a circle into a square shape.  Your t.p. holder should end up being about 6 inches x 6 inches.
After that, there really aren't any specific instructions... just try to bend the hanger into a 6 x 6 square shape on 3 sides, then on the final side, bend a half oval shape into the inside of the square.  Use the picture as a guide.  You may have to play around with it and re-bend the hanger several times in order to get the right shape.  By the end of the project, I was starting to feel like it was a Rubix cube since I had to keep going back and starting over again.  This would be good for a bathroom that doesn't have a t.p. holder, or for camping trips.  I haven't decided what I'm going to use it for yet, but I just had to try it.  It costs nothing to make, and it only took me about 15 minutes.


Thursday, March 22, 2012

Chicken Vegetable Chowder

I absolutely love chowders.  I previously posted my recipe for Cheeseburger Chowder which is low carb, but high in fat and calories.  I decided I needed to create a new chowder recipe that is not only low carb but also lower in fat and calories.  So I threw something together, and it was very tasty!  Here's what I came up with:

Chicken and Vegetable Chowder

1 cup chopped carrots
1 cup chopped broccoli
1 cup canned corn (no sugar added)
1/3 cup chopped onions
1 10 oz can of chicken
1 1/2 cups milk (not pictured)
12 oz Cream of Cauliflower Soup (Or, if you must, 1 can cream of potato soup)
1 8 oz package cream cheese or Neufchatel cheese
1/2 tsp garlic powder
1/4 tsp parsley flakes
Salt and pepper
Mix all ingredients except cream cheese in a large bowl.  Pour into crock pot.  Top with cream cheese and cook on low for 4-6 hours.  Stir periodically to mix in the cream cheese.

This makes a great freezer meal as well.  I mixed up 3 batches of it and froze the other two.  When you mix all of the ingredients except the cream cheese in a large bowl, just pour the extra into a labeled freezer bag.  Lay it flat in the freezer and freeze.  The day before you eat it, just put it in the fridge so it can thaw out.  Then pour it into the crock pot, add the cream cheese, and cook.
As you can see, when I first started making this, I planned to make it just vegetables.  But I decided to add the chicken at the last minute, and I'm glad I did.  When I make this again, I'll have to remember to add the chicken too.

This was one of those things that I wasn't sure how it would turn out, but it turned out great!  I'm excited to have another healthy and delicious meal to make for my family.  And I'm excited that I don't have to make it the next 2 times since I made extra! ;)


DVD Cabinet Organization

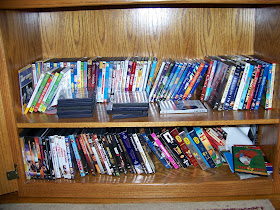
Our family has quite a collection of DVDs.  It started before my husband and I met.  He already had a large DVD collection.  I had a large video collection, which quickly turned into a large-ish DVD collection.  We got married, and we had a HUGE DVD collection.  We had a child and it got even bigger when we added kids' DVDs to the mix.  Over the years, we have cut down our collection by quite a bit many times.  But we still have 250+ DVDs that we can't bear to part with.  And I don't think that's such a bad thing.  We just happen to like movies.  But here's the bad part about having so many DVDs:
 Those are double stacked on the bottom.  And these aren't even all of them.  There is another cabinet too, plus more in our basement.  I have been planning to do an overhaul on our DVD cabinet for quite some time now.  We could never find the DVD we wanted because... well, because of this mess!
So I went in search of some bins or baskets that would hold DVDs, fit in our cabinet, and also not cost too much.  I finally found some plastic bins at Target.  They still cost a little more than I would have liked, but at least I got all of them on sale.  I could only get them a few at a time because Target only has a few of them on the shelf at a time.  So it took me awhile to get my cabinet totally organized. 
I used labels and a marker to label each bin for a different category.  By the time I got to the end of the DVD pile, I found that I had several that didn't fit into any of the other categories.  Or they did fit into a category but there were not enough of each kind to fill a bin.  So I have one bin that is labeled Sports/007 (Sports movies and James Bond movies.  Nope- not mine.)  And I have another bin labeled Misc. 
I had to go back to buy more bins I think 3 or 4 times.  But finally I got all of the DVDs put away and organized.
Ta-da!  And I still have room for one more.  I know we have more DVDs in the TV cabinet plus in the basement, so I could bring those up and put them away so they are all in one place.  Or, I could look at it as room to grow. =)  Now I am happy because all of our DVDs are put away and easy to find.  And they look so pretty!


Monday, March 19, 2012

Save Unused Napkins from Restaurants


Whenever we go out to eat, we end up with way too many napkins.  Whether we pick up fast food or are at a restaurant, we end up with a huge pile of napkins.  I don't know if they assume because we have a 3 year old we will need them, but we have always gotten a huge pile of napkins wherever we go to eat, even before we had a child. 
I used to just throw the extra napkins away with the fast food bag, or leave them on the table if it was a sit-down restaurant.  But then I thought, Why do I buy napkins at the store and then throw these perfectly good napkins away?  Maybe in the back of my mind, I thought I was stealing if I put the napkins we didn't use in my purse.  But the truth is, if you leave unused napkins on the table at a restaurant, they will most likely throw them away. (And to be honest, I hope they do.  If someone doesn't eat their sandwich, do they re-serve it to another customer?  Something about it just doesn't seem sanitary to me!) 
So I started saving unused napkins.  I started doing it about 5 or 6 years ago and I haven't had to buy napkins ever since.  And we really don't go out to eat that much.  Okay, more than I would like to admit, but not that much.  I know sometimes it's easier to just throw them away, but before you do, think about how wasteful it is.  You can easily stick those napkins in your purse or pocket and I guarantee you will need them, possibly even before you get home!  I encourage you to try it.  By saving unused napkins from restaurants, you are saving money and being green at the same time.

Sunday, March 18, 2012

Cream of Cauliflower Soup

If you are watching your carbs like me, you know you have to avoid potatoes like the plague.  But what about all of those yummy chowders that are mostly low-carb except for the cream of potato soup?  I discovered a low-carb substitute for cream of potato soup and I can barely tell the difference.
I modified this recipe from one I found in 500 Low Carb Recipes. 

Ingredients:
3 tbsp butter
3/4 cup onion
1 32 oz container of chicken broth
1 10 oz package frozen cauliflower
1/2 tsp xanthan gum
1/2 cup half and half

Salt and pepper

Directions:
Melt the butter in a saucepan.  Add the onion and cook until it is translucent.  Add the chicken broth and cauliflower and cook until the vegetables are tender.
Carefully pour the contents of the saucepan into a large food processor.  Add the xanthan gum and puree. 
 Return the ingredients to the saucepan.  Add the half and half and salt and pepper and heat through.

This makes about 36 ounces of soup, so it's enough for 3-4 cans worth.  I separated mine into 3 12-ounce portions.  Use it in place of cream of potato soup in your favorite recipes.  Or, stay tuned because I just *may* be writing my own new recipe that includes cream of cauliflower soup!


Thursday, March 15, 2012

Chip Bag Shrinky Dink Key Chains

A friend of mine showed me how to make these a long time ago.  Recently I found the shrinky dink chip bag he gave me and I decided to try making my own.  Except I wanted to make something cool with them.  I came up with the idea of making key chains out of them.
First of all, I want to start by saying DO THIS PROJECT AT YOUR OWN RISK.  It involves putting things in the microwave that you really shouldn't.  This will make sparks in your microwave and could be potentially unsafe or harmful to yourself or your microwave and I can't be held responsible for any accidents.  That being said, I have made half a dozen of these in my own microwave with no injuries and my microwave still works just fine.  Just use caution and your own judgment.

Start with some mini snack-sized chip bags.
Cut a hole at least the size of a quarter near the top or the corner.  Be sure not to cut the hole too close to the edge.  Remember, these are going to shrink quite a bit, so leave plenty of room around the edge.
Place the bag in the microwave (only one at a time).  Turn the microwave on, but don't walk away.  This will take literally 5 seconds.  And, as I said, it will cause sparks, but it will quickly shrink the chip bag down right before your eyes.  Be ready to open the microwave door quickly.  Carefully remove the bag from the microwave.  You may even want to leave it in there for a minute or two.  It will still be very hot.  It takes about 5 minutes for the bag to cool and harden.
Wait until they have hardened completely, then thread a keyring through the hole you made.  Voila!  You have a cool key chain or zipper pull to always remind you of your favorite chips!  I think this is a project kids would enjoy (with supervision of course), especially 8-10 year old boys.

Hair Straightener to Remove Hanger Marks

I have worked from home for the last year and a half, but over the last few weeks I have been working in the office.  Which means that I have had to shake the dust off of my work clothes.  Most of them haven't been worn in the last year and a half.  And I have found that most of my shirts have hanger marks a.k.a. "shoulder nipples."  Now I know they say you should use wooden hangers to prevent them, but not all of us have the money to spend $5+ apiece on hangers for each one of our shirts.  So we just use what we have and deal with the consequences.
Well, the other day I was getting ready for work.  I was straightening my hair as I looked down and noticed the "nipples" on my shoulders.  Errrgggh, I thought.  I am so sick of this happening every morning when I get dressed.  Maybe if I had time to get the iron out, I could iron these puppies out.  And then my eyes turned to the straightener and I had a huge DUH moment.  I immediately flattened out the hanger marks using my hair straightener!  Here is a before picture:
(Sorry about the poor quality pictures.  It is not easy to take a picture of your own shoulder!)

You can either iron them while you are still wearing the shirt, or take it off.  I recommend taking it off for safety reasons, plus it makes it easier to iron. 
I simply "straightened" the fabric with the straightener like so:


And now it's as good as new.  You can't even tell it was there. 

What an easy and convenient way to fix those hanger marks using something you were probably going to use while you were getting ready anyway!

 
You may also like: DIY Non-Slip Hangers

St. Patrick's Day Shirts

I made these St. Patty's Day shirts last weekend.  I really meant to post this sooner, but haven't been able to because of my crazy work schedule which will soon be getting even crazier.  Anyway, it took me about an hour total to make both of these.  So it is very quick and easy.  I started with 2 plain green shirts.

It's surprising how hard it was to find plain green shirts in March.  I went to I don't know how many stores before I found these.  I got mine at Old Navy.  I wanted both of them to be long-sleeved, but it is supposed to be in the low 80's on Saturday so I don't think it will be a problem... for me, at least.  I got Angie's shirt in the boy's section at Once Upon a Child.  I may have to shorten the sleeves because she is gonna be warm in that shirt.  Anyway, I'm off topic.
These are made the same way as the Valentine's Day heart shirts that I made last month.  You start by turning the shirt inside out and ironing on a piece of fusible interfacing where you want the shamrock to be.

Then turn the shirt right side out.  Using a shamrock cookie cutter, place it on the shirt and trace over the interfacing around where you want the shamrock to be.  I recommend measuring first to make sure it's centered.


Turn the shirt inside out again.  Pin your pre-washed fabric over the back of the shamrock tracing. 
Once again, turn the shirt right side out.  With a needle and thread, sew around the shamrock using small stitches.
Once you have sewn all the way around the shamrock, pull the top layer of fabric (the shirt and the interfacing) forward and cut through it.  Be very careful not to cut through the back piece of fabric.  Continue cutting out the shamrock shape close to the edges.


Now you have a cute St. Patrick's Day shirt for yourself and/or your little one to wear!


Saturday, March 10, 2012

DIY Non-Slip Hangers


After I came up with this idea for fixing slippery shoes, I thought, why not use the same technique for other things?  And then I saw this post about using rubber bands to keep clothes from falling off the hangers, so I thought, why not use a hot glue gun?  So this morning I grabbed about 20 plastic hangers and very quickly, easily, and inexpensively converted them into non-slip hangers.  We all have at least a few shirts that just don't want to stay on their hangers, so this is a project for everyone.
Simply "draw" a zig zag line of glue on both sides of the hanger.  It doesn't matter if you get it perfect, as long as there is glue there, it creates something for the clothes to hang on to. 

After you are done, hang them where they won't touch anything else. If you don't, then you could end up with a hanger glued to your wall, and you'll have to find another blog to solve that problem. ;)  The good news is that they dry very quickly.


It's kind of hard to see the detail in the pictures, but I think you get the idea.  I couldn't believe how fast and easy this was.  I tested it out with one of my pesky shirts that never stays on the hanger, and by golly, it works!

By the way, if you haven't already, make sure to go to Making Cooley Stuff on Facebook and like the page so you get all of the updates on new posts!

Thursday, March 8, 2012

Frito Pie With Real Frito Crust

The first time I made Frito pie, I expected it to be more like an actual pie, not a pile of Fritos with chili, onions and cheese dumped on top.  Don't get me wrong, Fritos with chili dumped on top is good, but anyone can make that.  What I had in mind was a pie with an actual Frito crust, filled with chili, onions and cheese.  But I never could find a recipe for it like that.  So I pretty much stopped making it.  I felt lazy for serving nothing but a pile of chips with stuff dumped on top of it for dinner.
Well, recently my husband started asking to have Frito pie for dinner again, and I thought, well, maybe if I can figure out how to make an actual pie instead of the way I was making it before... So I did some searching online.  I didn't find much, but I found some comments on a Q&A site where someone else had asked about Frito pie crust.  Using the information I found there plus a recipe for a graham cracker crust, I came up with the perfect recipe for Frito Pie.  Here goes:

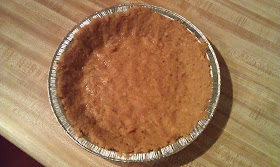
Frito Pie Crust:
1 1/2 cups crushed Fritos or other corn chips
2 egg whites beaten with 2 tsp water
1/4 cup melted butter


Mix chip crumbs, egg whites and melted butter in a bowl.  Press into an ungreased 9 inch pie plate.  Bake in the oven at 300 degrees for 7-9 minutes.  Remove from the oven and let cool.


Frito Pie:
1 pre-made Frito pie crust, cooled
2 cups of chili
2 eggs
1/3 cup onions
1/2 cup cheese

Mix the chili, eggs and onions in a bowl.  Pour into the pie crust.  Top with cheese.  Bake in the oven at 325 degrees for 10 minutes.  Slice and serve.


I was really happy with how it turned out.  As with any new recipe, I wasn't sure how it would turn out, but it was exactly what I was expecting the first time I made Frito pie.  Delicious!


Monday, March 5, 2012

Princess Castle Cake

I made this castle cake for the girls' birthday party.  I am by no means a baker.  I do very little baking, and even less "decorative" baking.  Meaning those fancy cakes and cupcakes like you see on Cake Boss and DC Cupcakes.  Yeah, I am nowhere near those.  My cakes are closer to something you'd see on Cake Wrecks.  So my cake is nowhere near perfect, but I think it turned out okay.  Here is what the finished cake looked like:

I got the recipe for the cake in a Childrens' Betty Crocker Cookbook that is older than me.  I figured if the recipe was meant for children, then it must be about the right skill level for me. ;)  I don't have step by step pictures, but the cookbook didn't have them either, and it's really not that difficult. 
You start with a cake mix, just prepare according to the package directions and use a 9x13 pan.  Try to use one with more squared edges instead of rounded.  That is something I learned while making the cake.  My pan had rather rounded edges, which made this project a little more difficult.  Obviously still doable, but more difficult. 
Once the cake is done, let it cool for about 20 minutes.  Then turn the pan over and carefully remove the cake.  Cut the cake in half, width-wise.  Take one of the halves and cut it into thirds. 
You can use a baking sheet or a piece of cardboard to build your castle on.  I had an old Taco Bell tray that I covered in aluminum foil.  I just assumed most of you don't own a tray from a fast food restaurant.  But if you do, it makes a great place to build a castle cake!
Place the uncut half on your tray and frost it.  Then place two of the cake strips on either side of the cake and frost them.  Cut the third strip in half, then using a knife, cut the fronts so they have rounded edges.  Place them on either side of the cake as shown in the picture and frost them as well. 
You will need two ice cream cones to make your towers.  Frost the two cones and then cover in sprinkles in the color of your choice.  Place the towers on top of the sides with the rounded edges as shown.  Use pieces of a Hershey bar to make windows and a door.  I used toothpicks to make the drawbridge.  I also used spice drops to decorate the top of the castle.  The original recipe said to use pillow mints.  But if I ever make this again, I think I may use marshmallows instead.  Basically you can use any small type of candy you want.  The last thing I did was make little flags out of paper and toothpicks and I wrote each of the girls' names on them and placed one on each side of the castle.  Oh, and I took some of Angie's plastic princess dolls and put them all around the cake.  It really wasn't very hard, even for a novice baker like me. 
Here are the princesses blowing out their candles!


Tuna Rice-a-Roni

This is another one of my "tuna to the rescue" meals.  A quick, easy, delicious meal.  Not to mention very inexpensive to make.  All you need is:
1 package chicken rice-a-roni (I use the low sodium version)
1 can cream of chicken soup (or make your own for a cheaper, healthier version)
1 5 oz can tuna


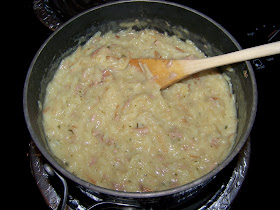
1.) Prepare the rice-a-roni as directed on the package.
2.)  Stir in the cream of chicken soup and tuna and cook until heated.

See?  Easy, fast, and delicious!  I usually serve it with a side of vegetables.  Everyone in my family likes this, even my picky 3-year-old.

For more easy tuna meals, check out my Super Fast and Easy Tuna Mac and Tuna Burgers.